


| How to Use and Make Your Own Slider Float Using the Slider Although a slider float can be used in shallow water, when the bankside vegetation is too heavy to allow you to bring the rod up to the vertical before casting, it is more commonly used in depths of water of around 15 – 20 feet. The slider float allows you to cast around 5ft of line or less from your rod top even though you will be fishing at a much greater depth. The first job is to put the slider float on your line, followed by a small bead. Next you pinch on the bulk shot, and attach the hook length using your preferred method. The bulk shot goes about 3 – 4ft from the hook, and in between this goes a number 4 tell-tale or dropper shot, about ten inches from the hook. Some people put a small shot about a foot from the top of the bulk shot for the slider to rest on, but I have never found the need to do this, so consider it optional. Let us say you are fishing in 15ft of water; you then need to tie on a sliding stop-knot above the float or you could use two rubber float stops. If you think the depth is around 15ft, move the sliding stop-knot or float stops up the line to around that depth. When casting out you will notice that the slider float is only about 3 – 4ft from the hook. As you cast out, leave the bale-arm open so as to allow the bulk shot to pull the line through the eye of the float. When the slider hits the stop-knot, you will then be able to adjust the knot either deeper or shallower until you have got the correct depth. Ideally the hook bait should be on the bottom, but the dropper or tell tale shot should be off the bottom. It also helps if the wind is coming off your back, so that the float is not continually drifting back to the bank. I find that this is the ideal way to position yourself on the bank. River Slider You will notice that the slider float used for river fishing is somewhat different to the stillwater slider. The Slider used for river fishing is smaller and has two standoff eyes to allow free passage of the line before the float hits the stop-knot. As mentioned elsewhere on the forum, they are ideal for casting in between clumps of weed when you don’t want your hook length to get caught up. They are also used in exactly the same way as the stillwater slider when the depth is greater than the length of your rod. DIY Slider Float
Ideally, the float should be weighted with enoughwindow lead to sink the balsa body and about one third of the peacock quill. The purpose of this is to ensure the float is heavy enough to go out first when casting. The bulk shot goes about 3 – 4ft from the hook, with a number 4 dropper shot about ten inches from the hook 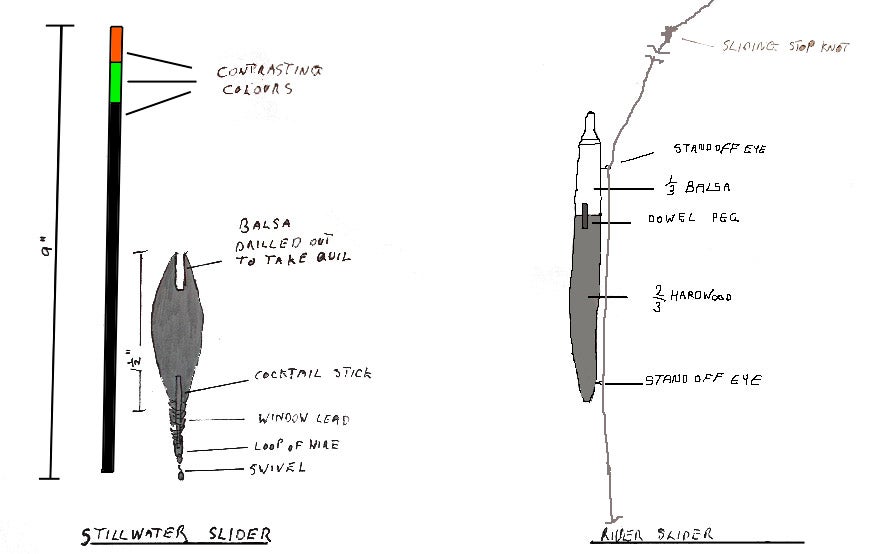 All it needs now is a paint job. I would advise having two colours on the float tip. The tip itsself could be fluorescent orange with about an inch and a half of white underneath it and a contrasting colour underneath that to make lift bites easier to spot at distance. | ||
|
Welcome!Log into your account