| FIRST CLASS FISHING | |
Dave will cover a specific topic at a time in this bi-weekly column. The first section will be really basic with subsequent ones building on the skills covered previously. His aim is to explain things as simply and concisely as possible and will assume that the reader knows absolutely nothing about the subject. |
| LEGERING – Part Four Light Legering on a Small River The first three parts of this legering series have introduced quiver tips and some stillwater set-ups. In part four I shall be looking at using a light quivertip set-up on running water, a method ideally suited to a day of roving from swim to swim on small rivers. The Tackle The typical target fish on a small river are going to be the likes of chub, roach, perch and bream so the rod needs to be geared to these species. We are looking towards sensitivity rather than power, a rod that is going to be forgiving in it’s action and fun to use when these species are hooked. It also has to have a selection of soft glass quivertips offering the minimum of resistance, because if too much resistance is encountered too soon these small river fish will quickly reject a bait. The ideal rod for these occasions is an 11ft quivertip rod with a test curve of around 12oz to a 1lb, a soft rod with a through action. It should have a selection of tips from 1oz to 2 1/2 oz which will cover most eventualities encountered on the typical smaller river. There are a number of Avon style rods around now that fit the bill perfectly, especially if they come supplied with a standard top as well as the quiver section, enabling the rod to be used for float fishing and floodwater legering as well as standard quivertipping. The reel should be a ‘3000’ size, loaded with 4lb breaking strain sinking line. Up to 6lb may be required if big chub are being targeted in snaggy swims and maybe down to 3lb if shy biting big roach are the target, but 4lb is generally fine. It’s important that the line sinks as most of the time you will be fishing with very light presentations that barely hold bottom and you want to get the line between rod tip and terminal tackle straight as quickly as possible.
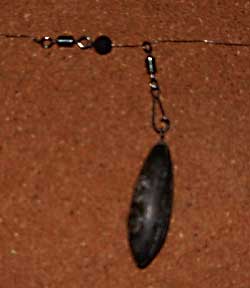
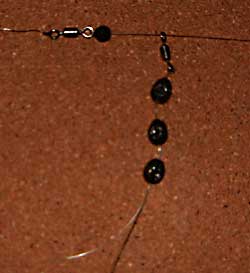
Terminal Simplicity When the water levels in the river are normal or low, the leger set-up for this style of fishing is simplicity itself , although actually fishing it well is not so simple as I will explain later. It takes a bit of patience and thought to get it working well. This rig is the link leger. As with most rigs there are a number of ways to set up a link leger, but here’s how I construct mine. It consists merely of two swivels, a rubber bead, a short length of mono and a variety of split shot.
In high water or faster currents it may be necessary to use heavier weights than can be reasonably achieved with split shot and a bomb weight is a more sensible option. This rig can be easily changed to do this simply by removing the mono link from the free running swivel, attaching a snap link to it instead and then attaching your bomb to the snap link to create a running leger rig. Travel Light As I mentioned earlier this method is ideal for roaming the smaller river, moving from swim to swim hunting for chub, perhaps spending only fifteen minutes in each swim before moving on to the next and searching out just one or two fish maximum from each. Or perhaps when targeting big perch from deeper holes with lob worms or big roach on bread flake from the steady glides often found on these rivers.
Fishing the Link The link-leger is definitely very easy to set up, but to fish it properly you need to be prepared to chop and change the split shot to suit each swim. So let’s look at how to approach a day out roaming the river. The first thing to do is to choose a quivertip. This has to be a bit of a compromise as the flows will vary along the length of the river, but choose the softest tip you think you can get away with. Usually a 11/2 oz or 2 oz rated tip will be about right. If, however, after fishing for a while you find the tip is too soft or too stiff, change it! Don’t put up with an incorrect choice as it only takes a few minutes to break the tackle down and start again. With the tackle set up, the next thing to do is to work out the amount of weight needed for the particular swim you are in. Make a couple of exploratory casts to see how the weight reacts. You need to add or subtract shot until the weight just holds bottom where you want to fish. Use as few shot as you can to minimise the amount of resistance to a biting fish. You know the weight is right when a small lift of the rod tip causes the weight to shift slightly in the current, but it doesn’t get dragged into the edge by the flow. I tend not to use a rod rest for this style of fishing, preferring to hold the rod and balance it across my knee with the line hooked around the index finger on my rod hand. This way I can feel any gentle plucks on the line and instantly hit bites when they occur. Baits and Baiting Up When you are happy with the balance of your rig it’s time to fish. Often you can fish with just a hookbait, with no need to introduce any free offerings. If you feel it’s necessary, introduce a few free samples by hand to encourage the fish to search out your bait. Make sure any loose offerings you do introduce end up where your hookbait is going to be by taking account of the force of the flow. This method can be used with a variety of baits, namely worms, sweetcorn, cubes of luncheon meat, cheese paste and bread. That’s it for part 4. In part 5 of this legering series I will be staying on running water and looking at how to fish big feeders on big rivers. See you then. |