


The name “plugs” is very much an English term for in America, they’re known generally as crankbaits. I suppose the term comes from the fact that after casting them out, you have to crank or wind them back in and this is what gives the baits their action. Much larger baits are known as jerkbaits because after casting, you jerk them by flicking the rod tip dowwards.
PART 3 – PLUGS
Be honest, whenever you visit a tackle shop and you’re confronted with a board full of different lures, what catches your eyes first? It’s the plugs, crankbaits, and jerkbaits, isn’t it? Anything that bears a resemblance to a fish’s body.
It’s quite a wide range as well for there are also the top surface poppers as well. In all manner of colour combinations there’s always plenty to temp you to part with your hard-earned. They are also a lot dearer in general than spoons and spinners and they do work, just not quite as well from my point of view compared to the increased item cost. However, let’s look at some of the types and their design features.
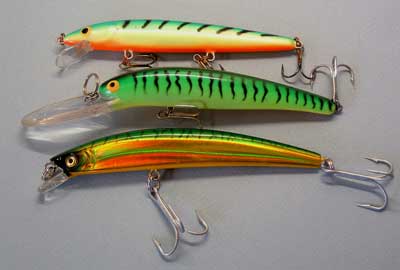
First of all, the diving plugs
You notice these have a vane on the front and it is either a long vane or a short vane. The longer vane defines it as a deep-diving plug, designed to fish lower in the water even though most are floating lures, they start on the surface and as soon as you pull them, they dive. Some can dive to 15 feet or more with very little pull and then there are those that will sink anyway, but ever so slowly, on their own accord.
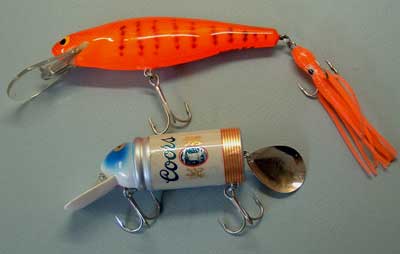
A Bagley E-Z Lure with an orange squid on the tail and the Coors Special!
The ones with shorter vanes also have a more acute angle of lip to the body to keep them up near the surface when drawn back, these are the shallow divers. Some of these are best retrieved in short bursts to replicate a dying fish that keeps trying to dive to safety, but fail and float up to the surface. What you will find with all divers is the depth they dive to is marked on the box, that’s not much use though when you’ve thrown the box away and you’re using it.
With all diving plugs (or crankbaits if you want the American term), you can find them in one-piece solid or jointed. This means that some will come in two parts (very rarely three) and joined in the middle by two eyes. What this achieves in a well designed plug like the Creek Chub Pikie for example, is that the back end moves like a fish waving its tail giving a more realistic movement all over.
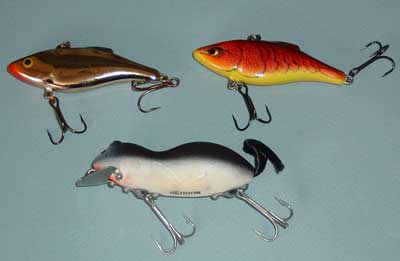 Top, two Rapala Rattlin Raps and below a Heddon Mouse |
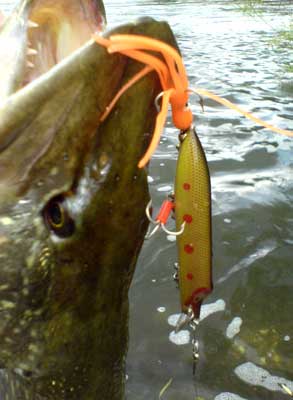
You can also improve some plugs by fixing a rubber squid on the tail hook (see photo). These rubber extras are sometimes sold as a squid lure for mackerel. You may have to remove or cut the tail hook off with side cutters (see part 1) and use a new hook affixing it with a split ring to the eye that should be firmly stuck in the body. The overall effect is to see the plug yawing side to side and the flowing rubber tail following it like a real fish’s tail.
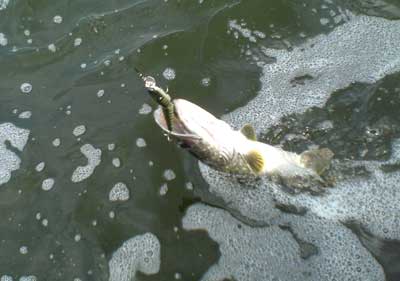
A pike comes in on a Creek Chub Pikie, proving they work.
 |
|
This 40 year old Abu lure |
See if you can lay your hands on the Creek Chub Pikie, any size, any colour, but the bigger the better, jointed and with the perch colour. The red head version is good also, as is the pike colour. Even though these are more of a shallow diver (down to 9 feet), it still pays to draw them back nice and slow and steady. The bites are very savage!
More of a mid-depth diver is the Storm Deep Thunderstick, any colour will do. Bagley’s E-Z (the one in the picture with the orange squid tail) is another deep plug and some of the Japanese Yo-Zuri plugs have great actions. Of course there’s an endless selection of Rapalas too in all sizes, jointed and one piece and a wide range of colours. Watch out for the specials, there’s a Coors and a Big Bud beer can and they work!
Whatever you buy, choose quality over price every time, you need to be sure that all the eyes and hooks inside are strong enough to hold together. Buy a cheap plug and it could all fall apart under the first bit of tension from a taking pike and you don’t want to be left with a bit of diving vane on the end of your trace with the rest of the plug stuck in a free swimming pike.
Surface Poppers
As the name implies, these plugs rest on the surface and to activate them, you simply snatch at the line by flicking the rod tip. This causes the lure to bite into the surface of the water and causing a pop, sometimes a squirt of water too. Keep doing this and you have a lure that drives pike crazy, particularly in summer when they will come up from their depths and take a lure into the air with sheer force.
You can get a few that are jointed, but most have a short single solid body with the front hollowed or gouged out to force the water up front of the lure causing the ‘pop’. Most famous of these poppers are lures like the Heddon Lucky 13, or the Arbogast Hula-popper, the first ever lure sent to me from America by a late friend who was travelling around the world at the time. I daren’t even use it now for fear of losing it along with the memory of him. Luckily I have another copy of it in a different colour.

There’s also, as you might expect, one from Rapala called the Skitter Pop with some glitter on the tail; everything to make you want one! Also you get crawlers, not representing any known wild British animal to my knowledge, such as the Arbogast Jitterbug and Jitterstick. The Jitterbug waddles from side to side across the surface, whilst the Jitterstick does the same, but also has a small propeller in tow as added attraction. The really big Jitterbug comes armed with two huge hooks in each side and I modified mine, creating a new single hook underneath and filling the old holes with bathroom silicone.
Back to Heddon and the Crazy Crawler that appears to be swimming since, after casting, two arms fold out to catch the water and these can be very attractive to pike. Now, whatever you do, don’t forget the Heddon Mouse. It even has a tail and these come with or without diving lips. A very plain torpedo-like lure that just glides across the surface is one called the Zara Spook (there’s a super and a mini too) from Heddon.
One lure I should mention that is not a surface lure, neither is it a plug with a diving vane. It is the Rapala Ratlin’ Rap. A very short bodied thin lure, with a rattle and it sinks. You draw it back steadily through deep water, speed controls the depth, and it has a great shaking action. Always worth having one in your kit, but you do need to be over some deeper water, like from a boat, for it to work at its best.
Well, that’s most of the plugs dealt with. You may find some other variations from time to time and you may be tempted to buy some from the shops, but just remember, most are designed to catch anglers rather than fish. I’m not going to deal with jerkbaits because frankly, I don’t use them enough, well not the big ones at least and there are far more expert users amongst you lot that could easily write an article on them.
Traces
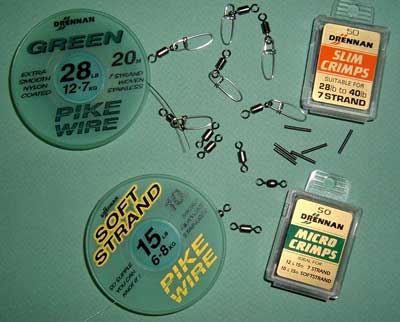
Stuff needed to make your own traces
Just a word on traces then, particularly making up your own. You need a spool of trace wire, I use 28lb Drennan Green for pike and 15lb Drennan Soft Strand for perch spinning (as a precaution against hooking pike). *Update – I’ve also started to use an American wire called “Bleeding Trace Wire” rated at 45lbs BS, it’s red and very good.* You will also need some crimp sleeves, normal swivels and some Fox Safe-lok Link Swivels. A pair of sleeve crimps to compress the sleeves and the long handled side cutters to cut through the wire trace material.
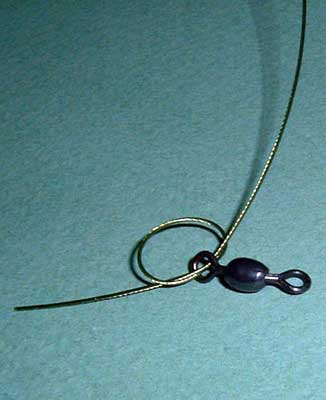
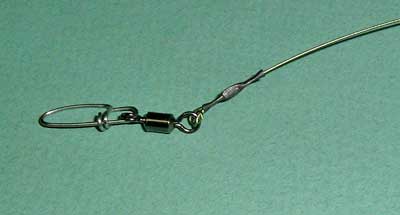
Passing trace wire through eye twice and simple overhand knot to twist the trace
Start by slipping a sleeve onto the trace material. Then take a Safe-Lok and push the trace wire through the eye of the swivel twice, I also tie a single overhand knot so that when tightened there is a twisted over double wrap of trace material pulling against the swivel’s eye (see photo). Now cut the loose end so that the crimp just covers it and slide the crimp on the wire over the trimmed loose end.
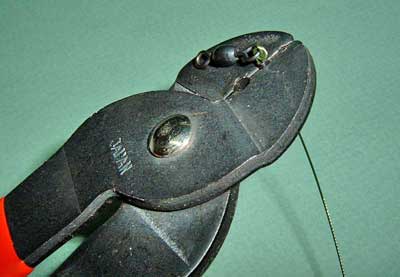
Crimping the sleeve. Leave a little bit of sleeve clear
The Finished Trace
Crimp the crimp sleeve with the crimp sleeve pliers – fairly obvious that one, but not too close to the end (see picture). I usually put three crimps in, one at each end the same way and the one in the middle turned 90°