Spodding and the use of a marker are useful skills for many areas of angling. Hopefully I’ll be able to give you a few tips. First off……. Marker Floats But let’s say you’ve arrived at the lake, chosen a swim you’ve never fished before, and there are no obvious signs of fish in your swim. You need to find a ‘feature’. This could be anything. A weedbed, a bar, or a patch of silt. Something that might hold some natural food, or an area fish will hold up near to. The simplest way is to just cast a lead out. Trap the line as the lead hits the water, and you’ll feel it touch down. A thud will indicate a firm bottom; anything else will mean silt (a softer thud) or weed (sometimes you wont feel anything). Hold the rod parallel to the ground, and slowly pull the tip back. If the rod tip just pulls around, and you felt no ‘thud’ it probably means weed. If there is some resistance, but the lead slides, then its probably silt. If you had a firm ‘thud’ but the lead slides, then it is probably thin silt or clay. A firm ‘thud’ followed by a ‘tap tap tap’ will indicate a gravel bar or broken ground. This is where a braided mainline can help, as there is no stretch in the line to absorb the feel of the lead. With gravel bars it is normally quite hard to pull the lead up the bar, then fairly easy to pull it across the bar (and if your careful you can measure the width of it), and then the lead just falls as it come off the top, and falls into the gully in front of the bar – a great spot to try as most seem to fish the ‘back’ of the bar.
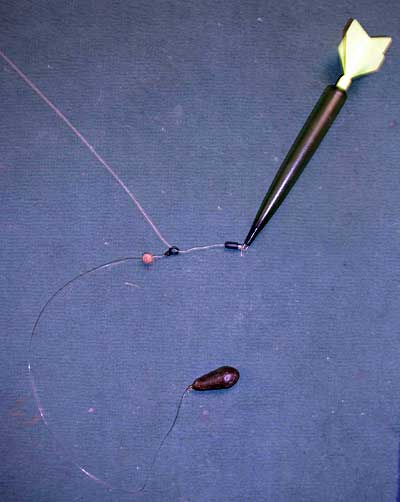
None of this, however, will tell you the depth of the water you’re fishing. Some say that you can judge the depth by casting out and counting the time it takes the lead to hit bottom, but it isn’t all that accurate. Also some gravel bars can be literally inches below the surface in one spot, and a couple of feet deep 5 yards either side. This is where a marker float can come in handy. The picture shows how I tie mine up, and I find it rarely tangles. The 12″ link between the run ring and lead ensures the line still runs smoothly even in silt or light weed. Simply cast out, tighten the line till you feel the lead and pay out line from the reel, 12″ at a time until the float pops to the surface. This will tell you the depth (remembering to add 12″ for the link). For carp, anything over 2ft will probably be okay. This now gives you a spot to cast to. For two reasons I normally cast an un-baited rig to the spot. One is so I can mark and clip the line up to ensure that the rig always casts back to the same spot, and the other reason is to see what the bottom is like so you know what you’re fishing over. I used to cast a treble hook out, especially over silt, to see if I could find bloodworms. Nice fat red ones are worth feeding over, the thin brown ones are usually from a spot already ‘harvested’ – but still worth a try. Once I’m happy with the spot, I bait the rig and cast out. Then its time for the spod rod……..
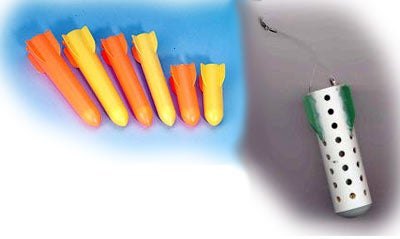
Spodding I now use a ‘specialist’ spod rod, the ‘Rocketeer’ by Bruce Ashby, but I’ve heard good things about the Greys rods, which are very reasonably priced. There are many different spods on the market, but I use two, the Gardener Pocket Rocket and the spod made by John Bryhn of Horseshoe Lake fame. Basically, the John Bryhn spod is used when I want to get a lot of bait out quickly, the Gardener one when a sprinkling of bait is required, or if I decide to put some bait over feeding fish. Of the bigger spods, I prefer the Bryhn model as it’s very buoyant, and with the holes in the body, it is easy to retrieve. There are some models that have release mechanisms, so the bait stays in but makes it easier to retrieve, but I’ve never had much success with them. The Pocket Rockets can be cast a long, long way, but the big advantage is that being so light, if you feather the cast they will land with hardly a splash, vital if you have to put bait out over feeding fish. So the first decision is…how much bait? The biggest mistake people make is to think, “I’ve got a spod and a bucket of bait, and lets get it all out.” Remember that a spod is really just a long range catapult, ie, if you would just use a couple of pouches of pellet in the margin, why use a kilo because your fishing 60yds out? A couple of spods full is enough to put an attractive feeding patch down. Also, remember that you’re not limited by what you put in them, so if you are using boilies, use different sizes, break some in halves and crumb a few, all little ‘edges’ that can catch out a wary fish. If I want to create a bed of bait, normally I start by clipping up and feeding bait 5-10 yards behind the marker with maybe 5-15 spods full. I then unclip and reel in a couple of yards, and repeat the process until I’m maybe 5 yards in front of the marker. I think this is better than putting all your bait right on the marker as it might attract more fish, and you don’t have to be quite so accurate on the re-cast, especially at night. Another trick, especially if using Method or PVA bags, is to not be particularly accurate on the cast, so the area is peppered with little clumps of bait. Obviously this isn’t quite as effective in deep water as the bait will disperse a lot on the way down. A couple of tips…
Use 6-8lb line – you’ll be able to cast further, but ALWAYS use a shock leader, even if you’re not fishing far out. Being hit by 8oz of spod wont be fun! When spooling up the reel, put a loop of powergum under the line clip, it’ll help protect the line. When casting, look up at 45 or so, rather than at the marker, you’ll find you can sometimes drop short if you are looking down at the marker due to you releasing the cast late. As I’ve said, if you feather the cast on the way down, you’ll find the spod goes in with a ‘plop’ rather than a ‘sploosh!’ It’s always worth putting a rod over the ‘spod spill’. This is where you lose some bait as the spod turns over just past the rod tip, and a little bit of bait ends up 20yds or so out. You can minimise spod spill by dunking the spod in the water before you cast, or by plugging it with a little groundbait, though I think it’s a bit too time consuming. My final tip is this. If you get to the lake in the dark, all is not lost. Pick a spot on the far bank and cast the marker out. Feel for your spot in the same way. If you want to measure depth, simply pull line off until the line goes slack. This’ll give you your depth without needing to see the float. Once you’re happy, simply clip up the line and reel in. It’s then just a case of walking down the bank with the marker float in one hand, and the spod in the other until you hit the clip on the marker float. Walk back and clip up the spod. Repeat the process for the baited rods, and you can cast out at the spot on the far bank and be sure that the spod is putting the bait over the baited rods. Make sense? |
Welcome!Log into your account