Stuart Dennis, an experienced angler of some 26 years has, until recently, concentrated mainly on catching tench, his favourite species. In the last two years, however, he has been suffering from carp fever and has realised that carp fishing is far removed from what he has been used to. In spite of his long experience and success with general coarse fishing, where carp are concerned he classes himself as a total novice.
Stuart says, “There are no doubt hundreds of questions we novice carp anglers would like to ask the experts, but unfortunately, for various reasons, we sometimes feel awkward doing so.
Rik and Stuart
“So what I’m going to do is get under the skin of one of our most experienced carp anglers, Big Rik, or Carp Angler, as he’s known on the forum, and shoot all those questions at him that you always wanted to ask, which will, as we go along, be turned into a series of features covering various carp fishing topics.
“As these articles run their course no doubt many questions will arise. So If you’re just getting started, or are an improving carp angler (or an experienced carp angler even, who just wants another opinion) and want to get under the skin of the expert, email me with your carp fishing questions at stuartdennis@msn.com and I’ll go banging on his door without a care in the world and post the results on here!”
PART 2 – MARKER FLOAT TECHNIQUES
Before we get stuck into this subject, I would like to say a big thanks for your supportive emails regarding this series and although we will cover every question that arises I feel we should immediately focus on the ones that seem to be puzzling the majority of us. So please keep sending me your excellent questions and I’ll keep badgering Rik.
There’s always an upside to my thinking and that is; With all this information we will definitely be catching more carp or else ‘Big Rik’ will be checking into a mental institute, so either way we are all winners here! (only kidding Rik, we love you really!)
Here goes…..
Rik, although within this section we will be covering Marker Float work, I’d like to start off by asking how many different rods do we actually need?. It could work out very expensive if you have three rods for bottom baits, and then need another one for a marker float and another one for Spodding. Not everyone can afford to be a tackle tart like you, so is it possible to use the same rods for every method?
It most definitely is. Although any rod used outside its scope will always be a compromise, but I will suggest that I don’t know what a marker rod should be like and I just use an old carp rod. I have heard some suggestions that a marker rod should have a stiff tip, whilst others recommend a through action tip. I personally don’t think it matters.
What is a Marker Float?
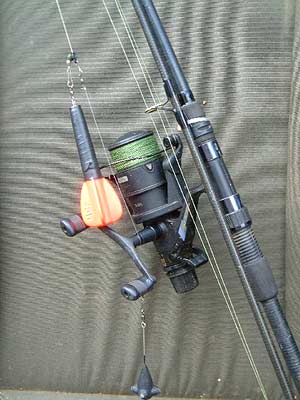
A marker float is a very buoyant float, much like a pike float, that will rise to the surface when you pay out line. Specialist marker floats are available that offer varying sizes, dependent on the size of lead used and the distance cast. Others also offer special shapes that fly truer over longer distances, etc. A basic marker float set-up can be seen in the accompanying picture.
Marker float and braid
So what are the benefits of using a Marker Float and what would this entail?
The basic idea is to wind the float down to the lead and then to slowly draw the lead across the lake bed and watch/feel the rod tip as it behaves differently across differing variations in texture.
As you come across a variation in the bottom you can then pay out measured lengths of line from the reel, until the float breaks the surface, to ascertain the depth.Doing this across the lake bed will build up a picture of the depths and types of bottom that make up your swim.
When would be the best times to use a Marker float and under what conditions would it best pay off?
It is always important to find the less obvious features in the swim, but dragging a lead and big float through the swim isn’t really a good idea if you have fish in the swim to begin with. The chances are that you’ll end up spooking them.
If you have a chance in between sessions and you’re not likely to upset others on the lake, then take the opportunity to have a good search around the swims and note down any distinct variations.
If this isn’t viable, then try having a go as you are packing up to leave, half an hour tacked onto your last session may reap you some tremendous rewards in future sessions.
What is the best way of determining the surface of the lake bed and how will I know what’s gravel, what’s silt and what is clay?
Generally, silt will feel like a smooth pullback, but with resistance.
Weed will just be a heavy and solid resistance.
Clay will make the rod tip bounce gently with occasional smooth pulls.
Gravel will vary depending on the size of the stones.
Fine gravel will give sharp, rapid and pronounced taps on the rod tip, where as larger stones will give very pronounced raps to the rod tip.
Experiment on some marginal area that you can see, so you can tell what the rod tip does.
If I have a spare or old rod and reel that I could use independently from my fishing rods, what line/braid, etc would you suggest I use. The reason for the question is that I understand that braid is far more sensitive than normal fishing line. If this is the case would braid give a much clearer indication of the bottom and surrounding features?
Because braid has no stretch, then any movement at the lead end is transmitted fully to the rod tip, and this means that the set up is much more sensitive. It really outshines mono when used at great distances, but again, experience counts for a lot when feeling for any contours or gravel patches.
The other issue is that it is quite expensive when compared to mono.
Let’s now recap and put the above information into some sort of working theory? We now know we can use practically any rod for marker float work, we know the best times in which to measure water depth and we know what indications on the rod tip indicate what type of lake bed features we have in front of us. We also know what a marker float looks like. Now we want to know how all this is put into action.
We’ve followed your set-up, we’ve got the lead set up the line with the float tied to the end of our line and we are ready to cast to the horizon. What actions are required to retrieve the line and are there any practical tips you can give us on how we feed the line through our hands and actually measure the depth at the same time?
Cast to your desired spot and tighten down trying to keep a straight line between rod tip and lead. Keep winding until you feel the float hit the lead. Now, with the rod tip just above the water line, draw the rod away from the water but parallel with the horizontal, slowly and smoothly.
To measure the depth, ensure you keep the rod still and pay out line from the reel in one-foot increments until the float surfaces.
A good tip here is to place a mark of some description on the rod (a blob of white Tippex is good) one foot in front of the reel.
I understand your thought process as to why you should use a marker float, but what are the advantages of knowing the depth, and can you give an example where using a Marker Float has paid off for you?
I don’t think we need to get involved too much in the actual depth but we should concentrate more on the variations in depths and the contours of the lake bed.
Looking from the bank the lake may appear to be featureless, but you could have a drop-off, a plateau, a bar and/or gullies, all of which are food-holding features and will thus attract the carp.
One particular instance comes to mind, where on a lake I fished there was a certain swim that was a bit of a flyer, where you placed both rods to the island margins which was about 20 yards out.
After a while runs from the swim slowed dramatically and then became virtually non-existent.Fish could still be seen entering the channel between the bank and the island, but no bites were forthcoming.
Careful use of the marker float found a slightly raised plateau about 6ins high and 3ft square at about 10yds out and this was the area that the fish were visiting.
This re-invigorated the swim for me and many further captures ensued. Nobody had bothered to investigate the bottom before, because the island had been such a sure bet.
Using the marker is fairly hard work, but the payout far exceeds the cost and it will beat the chuck it and chance it tactic hands down.
Well there you have it, as with all these ‘tips’ and ‘tricks’ I think it’s only fair to say that practice makes perfect. There is no substitute for trial and error, so give it a try.
Our next article will be covering some of the basics; like how to position your rods through to tying a hair rig.
As always, these articles are shaped by the questions sent in, so keep-em coming!