Long-Range Fishing and Baiting for Bream and TenchON THIS SITE and others the question of long-range fishing and baiting for bream and tench comes up time and time again.
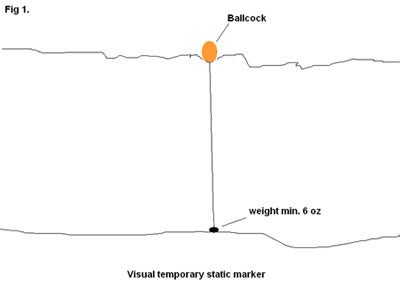
So I thought it was time I put my thoughts and experiences, based on nearly thirty years of fishing for the two species, down in cyber print. Baiting up Essentially there are three ways of getting bait out to fish at 60 yards plus on large stillwaters. 1. Using a boat of some description – be it a physically paddled one, or remotely controlled. 2. Firing it out by some mechanical means – Catapult or throwing stick in balls. 3. Casting it by feeder or spodding (Bait rocket). I discount throwing it out by hand at this sort of distance, unless you’re Hercules! It is critically important in my view that the baiting process is done as accurately as you possibly can. To this end the most accurate way is to use a stable paddled boat. Note I said stable paddled boat, not inflatable dinghy or rowing boat, as I have serious safety concerns about the use of these by anglers. Baiting from a Paddled Boat I have a lifetime’s experience of rowing boats (uncle had a boating franchise on a local lake) and over 20 years of angling usage behind me. So, in my experience the most stable is a flat-bottomed boat (punt type) or a rowing boat that has been made with a counterbalanced ballast in the base. Anything else, again in my view, is not safe to set sail for baiting purposes. There are three other safety concerns I have about using stable boats: 1. Can you swim? The top two should be obvious to all, but the third may not be. On large stillwaters the wind strength can be a lot stronger than you think it is and if you’re not a competent rower you’ll quickly find yourself in difficulties, as the wind take over the boat. When this happens, the trick is not to panic, attempt to keep the stern of the boat with the wind behind it, it will blow you into a bank at some point. Avoid at all costs getting side on to the wind, as an increased gust could flip your boat over. Rare with large flat-bottomed boats, but a possibility…..be mindful! You should always have a bailer in your boat, in the event you take on water through some unforeseen circumstances. Such a vessel allows you to get rid of it quickly, avoiding excessive weight and the possibility of the destabilising effects on the boat of excess water. Assuming you have all the kit and skills necessary, baiting from a boat is as follows – You can drop anchors front and back and bait from a static position. Baiting from one anchor has a tendency to spin the boat round and make life difficult. Or you can bait ‘on the drift.’ This method is my preferred option, as there are no ropes to trip over and mud weights to pull in, giving you a damned hernia, because they’ve stuck deep in the mud bed. When boat baiting, it’s best to place a good visual temporary static marker (orange toilet Ballcocks are good) at the back of your swim. This serves the purpose of knowing precisely where your baited area is and something to aim your casts to. (See Fig 1) The actual fishing line distance measurement to such marks I’ll deal with later.
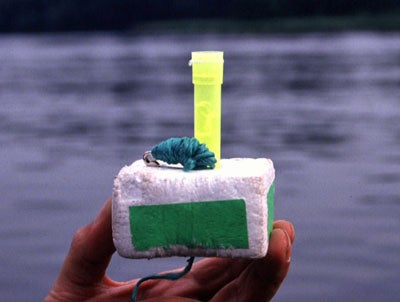
Before the Editor jumps in here, I have a very sophisticated swim marker that is an electronic flashing LED marker that can be seen at 300 yards or more. Kind of confuses all the planes coming into Manchester Airport to land! Yep, I made it years ago, and it’s still going strong! It’s now spawned sons of, which can be cast out on a marker rod.
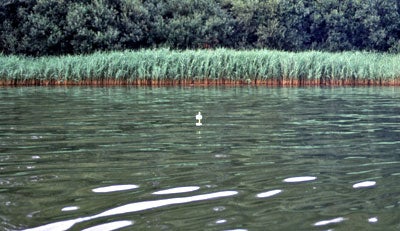
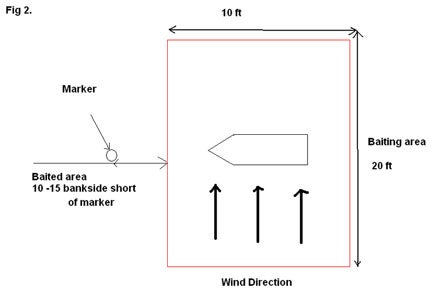
Anyway back to baiting on the drift. Ideally your baited area should be no more than 20 ft by 10 ft rectangle, or smaller if you can make it. To achieve this you need to manoeuvre the boat upwind of the marker by at least 10 yards and a good 10 -15 ft bankside short of the marker. Let the boat drift on the wind towards your proposed baiting area, using the travelling time to sort out that your bait boxes, buckets, etc, are to hand. When you’re about 10 ft from the upwind edge of your baiting area, start to feed with the wind, as the boat passes inline with the marker, you then feed on the other side of it and into the wind for the remaining 10 ft of your swim. (See Fig 2.)
The key here is not to rush your baiting and try to get it all in, in the first pass. Best to repeat the process as many times as is needed to get it right. In my view getting it right, is creating a well-scattered carpet of bait on the bed. This I call the Chicken Feeding Method. It’s one I look to create, whichever way I’m baiting up. I’m firmly convinced that an evenly spread carpet is vastly superior for maximising bites, to an area baited up with balls of groundbait. The reason for this conviction is, fish have to work harder (moving about the swim) picking up individual food items to get a substantial meal. This, I’m firmly convinced, maximises the chances of them picking up your hookbait. With balls of bait, fish can move into your swim, find a dissipated ball(s) of bait, consume it/them, get filled up, and move out of the swim without you ever getting a bite. As a point of interest, a standard crumb/corn catapult ball of bait normally dissipated into a saucer sized flattened shape on the lake bed within two hours. Before moving on to the next baiting method could I make one last safety point plea – If you drop anything over the side of the boat whilst baiting up, don’t make a sudden grab over the side for it. Several anglers, it’s thought, have lost their lives by drowning, through doing precisely that. Andy Mundy (RIP) is one that comes to mind, sadly and tragically drowning at Queenford Pit. So if it falls, ‘Let it go, it can be replaced – Your life cannot!’ Remote controlled boats Not having one, I’ve never used this method, but have several friends that use them. Whilst I wouldn’t discount them as they do have their advantages and put fish on the bank, they’re not for me! Too expensive, more trouble than they’re worth, always breaking down and/or batteries running out, more gear to shift to the remote far off swim on the lake, not very good in anything other than a light breeze and some clubs have bans on their use. One of the clubs I’m in has such a ban.
The advantages they have I can appreciate. Such as putting bait and hookbaits together, in a very accurately manner, in places you could never cast a bait to – small bars, drop offs, under trees, in holes in a weedbed and at distances way beyond what you could ever cast. However, with the exception of weedbed holes and possibly under trees, the rest could also be a disadvantage as well. You cannot create easily, the Chicken Feeding Method. They do have similarities with the balled baiting method. In so much as, they dump their hopper loads in a pile on the bed. Every time you re-bait you don’t always put the next drop in the same place as the last one. This is because of the amount the hoppers hold (1-2 kgs per hopper) could be magnifying the problem of the fish filling up and leaving the swim. I accept you could cut down the amount you’re dropping to increase your chances of not filling them up and maximising bites. But how many do? I’ve not seen much evidence of this from guys who use them. Some even tell you I’ve used X amount of bait this session and still not had a take. But if using one turns you on, I’m not against them. As I said, however, they’re not for me! Groundbait Balling This method can be done in three ways – remote controlled boating, catapulting and throwing stick. With remote controlled boating you substitute loose feed with balls of bait. I rarely use a catapulting these days, usually when I’m fishing close in, less than 40 yards say, and I can cast my hookbait very accurately on top of where the balls have landed.
A good Whopper Dropper catapult is needed for ball baiting at long-range. Balls the size of tangerines and as spherical as you can make them, I find the best. With the right ‘pult and some practice you should be able to hit the 80-plus yards mark. It does however take it out of your ‘pult-holding wrist when you’re firing out 50 balls at a time. On more than one occasion I’ve sprained my wrist whilst putting balls out. It’s also advisable that you fit a soft pouch to avoid ‘fighters knuckles’; battered, cut and bruised knuckles, which you get from hard plastic pouches……..Ouch that hurts! Throwing Sticks These, like catapults, have the ability to deliver balls of bait at long-range, but using one is a learnt skill in itself. They are not something you can just pickup and start using, you have to practice with them. The best way I found when I first started using one was to get in the park with a small beanbag or two, and start throwing them around. Within an hour or two of using the ‘stick,’ you learnt the nuances of it and become competent in its use. When I started with mine the only way you could get your hands on one was to make your own. I was fortunate that the late big bream angler Rodger Harker was a good friend, and had one I could copy. The design I believe, was developed by an old mate of the Editor of this site, Doug Sturmey.
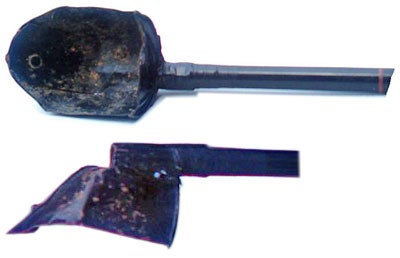
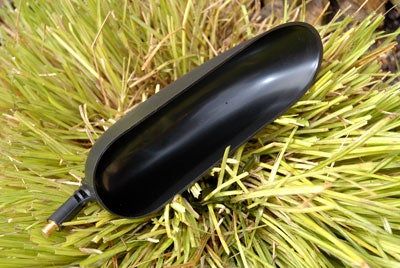
I still have the one I made back in the early 1980s (see picture above). Anyone wishing to know how to make one can contact me by e-mail and I’ll send them a scanned copy of an article I wrote in the 80s.
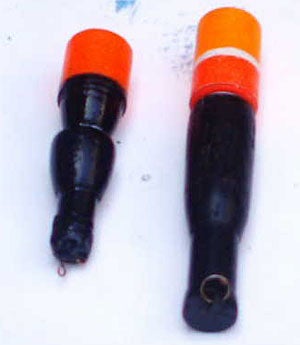
By the late 80s Cobra had started producing them in plastic that screwed into the top of a landing net pole, and later they made a dedicated pole to go with it. I don’t know how good they are, as I never had the need to buy one. But if they’re as good as my homemade one, they’re a useful tool to have if you need to ball bait. ……And you don’t get ‘fighters knuckles’ with them either! Spodding This method seems to be the vogue method at the moment on the waters I fish, and one I employ to good use, but mine has a twist to it. The standard way to spod is to using a carp spod (bait rocket) as it comes from the shop. Nothing wrong in this method and it does catch fish, but they do have a tendency to dump the bait in a pile on the bottom. I think its one of the Korda videos that shows this happening in part of its underwater footage. It was thought that the feed fell in an upturned funnel shape, spreading out as it went down through the water. The video clip I saw disproves this, and the bait falls straight down, settling in a very tight area, similar to a dissipated ball. This for me, and my belief in an evenly spread carpet, is not what I’m looking to create in my swim. After giving it some thought and having played about with mega feeders in the past I made some mega feeders to do the job. The job being, to lay down relatively long tram tracks of loose feed. Whilst the feeders did the job, I was struggling to cast them the distance in some of the swims I fish. However, I could cast a spod the distance without too much effort. This prompted another rethink and the cannibalising of the spods I had, and buying others with which to do the same. The twist Clearly, the reason spods go the distance they do, is because of the flights at the rear end of them and the nosecone shape. So the task became to adapt a spod, keeping as much of the assets they have, but would serve the same function as a mega feeder. Prototype 1 emerged with the flights section fitted to a mega feeder. (See Fig 4) This worked but was a bit on the heavy side. Another trip to the tackle shop and a good creative look at the spods they had in and I settled for two made by Quantum in their medium size range. Off came the red nosecone, which is an insert. Out came the balsawood nose float. I cut off a quarter of the nosecone from the point, creating a hole of about When you purchase through links on our site, we may earn an affiliate commission, which supports our community.
|
Welcome!Log into your account