THE METHOD FEEDER is simply a system which creates a concentrated feeding area, attracting the target fish to your hook-bait. Set up properly, it can also make your task of striking a suspected bite more successful by causing the fish to hook itself, when it tries to bolt with or eject the bait.
This is how I use The Method on stillwaters. This simple rig, with a few variations, will catch good carp, tench and bream. Unlike Jeff Woodhouse’s and Stu Dexter’s match angler’s version, my method is the carp angler’s ‘Method’.
Using this for carping my equipment is suitably substantial and I also have to consider my main hunting ground which is a 43 acre lake. This can often result in much searching for a clear spot where my target species will be feeding. I use Fox Warrior XT’s, 3lb TC as I regularly need to cast 80-100 yards to clear weed. For reels I really like my Okuma Epix Pro 50’s, spooled to the brim with Trilene 15lb mainline. For hook-link materials I use 12lb Drennan braid and 12lb Berkley ‘Vanish’ fluorocarbon.
The most challenging part on a lake of this size of course is finding the fish. On this water there are a few of us club members who fish for carp regularly, some have fished this lake for 20 years and more and their experience is both bountiful and willingly shared.
Where to fish changes with the wind and ambient temperature, as one end of the lake is quite shallow, good in summer, and the other much deeper, good in winter. Reconnaissance on the evening before you fish is invaluable, as the dusk draws in the fish start topping, this further defines the best part of the lake to target. Carpers spod these areas regularly which enhances the presence of fish willing to take the mainly artificial baits, ie, boilies and the like. All of this sorted, fish hopefully found, the following can really improve your likelihood of catching.
The Basic Rig
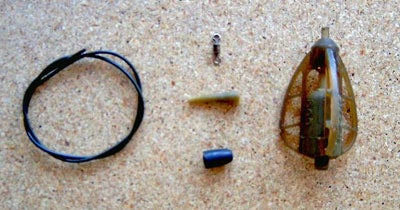
What you need: (See figure 1)
Back lead (Fox)
Tubing (approx. 1m [any brand not too soft])
Sleeve (sometimes comes with feeder, if not use one to match the feeder make)
Method Feeder Frame (I mainly use a Fox 60g but this needs heavy carp gear)
Swivel (Fox, size to fit snuggly in the feeder)
Figure 1
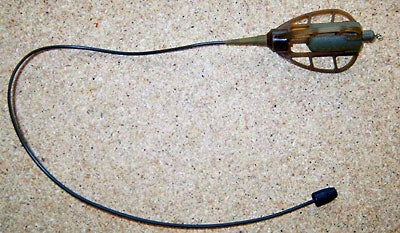
Once set-up properly, this part of the rig sits flat on the bottom from the back lead, along the length of the tube, up to and including the frame.
The order of assembly is as follows: put the back lead first onto your line, (correct way around if there is one, with the type I use it would be dome side to the rod), next feed the line through the length of the tube followed by the sleeve. So far, this part of the rig helps with camouflage, prevention of tangles and protecting the fish. To complete this structure the line now continues through the in-line frame and then tie with a suitable knot to the swivel.
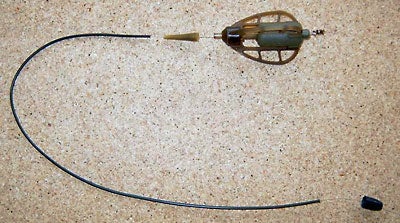
Figure 2 shows the rig, A) immediately after assembly, with all the individual parts separated and B) ready for the hook-link to be attached, the frame filled and hook-bait added.
Figure 2
Figure 2b
This basic rig is standard in format. From one angler to the next, the main differences are only the choice of manufacturer for the individual parts. This can result in very different looking set-ups but the differences are only cosmetic, style of frame probably has the greatest variety.
The tubing can also be selected to suit a particular venue, silt covered weed free bottom, use brown or grey, weed covered, use green.
Terminal Tackle
Although there are separate articles on hook-links, hooks and hair-rigs etc, the terminal tackle is an inherently important part of ‘The Method Feeder’ system, so I apologize in advance for any repetition now.
With the ‘business end’ of this system comes the really different opinions, does size matter?
Well I’m sure the arguments will rage on but what seems to work for me is: short but stiff or longer but floppy.
To clarify: I try one, if it doesn’t produce, I try the other.
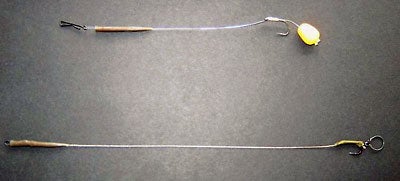
My short rigs are made with 12lb fluorocarbon and are 3 to 4 inches long (7.5cm to 10cm).
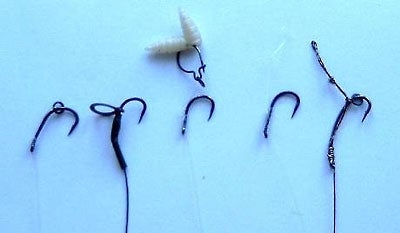
Figure 3
At this breaking strain the link is stiff enough to make ejection by the fish difficult, encouraging self hooking but flexible enough to present the bait in a natural manner. The short length results in the fish hitting the resistance of the weighted feeder, which aids self hooking. The fluorocarbon has a light refraction index similar to water, which makes your hook-link very difficult to see, even in the clearest of water. The long rigs (also in figure 3) are made from a variety of braids to be used according to the venue, they are 8in to 10in (20cm to 25cm) long where 10in (25cm) would be an absolute maximum. I have not personally used them as yet but these can also be made from coated braid which is far stiffer than the basic braid.
My favourite hook is a wide gape ESP barbless Raptor size 8, alternately a ‘Nailer’ size 8 mainly for ‘pop-up’ baits but can be just as effective with groundbait. As with all angling though this is not rigid; experiment until you find what works on the day. For this reason I carry a number of variations with hooks from size 10 to 6 for the Method Feeder. Another variation is type of hair; I carry a range including the sliding ‘O’ ring (used mainly on a ‘Nailer’), the loop with a ring and a plain loop. This way I can vary my hook bait to match the various ingredients of my groundbait around the feeder.
Whether a short or long rig, make them identically. That is, they both have quick links to attach to the swivel eye now protruding from the end of your frame. Both have a sleeve to cover the link, this helps prevent snagging of the line or worse, damage to the fish. Tie them to the quick link with a three turn grinner and to the hook by a ‘knotless knot’. What differs are the materials, ie, types and colours, or hooks, ie, type of hair, size of hook. Lastly, with the terminal tackle, is whether or not to use shrink tubing over the eye and ‘knotless knot’ of the hook. I use it on the braid to enhance the ‘bend’ which aids self hooking but not with the fluorocarbon as it produces the same effect simply by using the ‘knotless knot’.
Figure 4
Groundbait and Hookbait
There are a multitude of proprietary groundbaits out there, your local tackle shop will have a good stock of the most commonly used in the area and most will be all too willing to advise. My current favorites are from Dynamite Baits, I use their Method Mix and add a few of their 6mm Marine Halibut Pellets, to the water I add Marine Halibut Glug to enhance the smell and attraction. There are loads of recipes around to help prepare your own concoction if you are so inclined, I will simply share my views on consistency, in other words, how to make it stick long enough to cast out to your chosen spot.
When I mix my groundbait on the bank for the feeder I don’t add many ‘tit-bits’, this is because I usually fish this method over an area I’ve already baited by spodding.
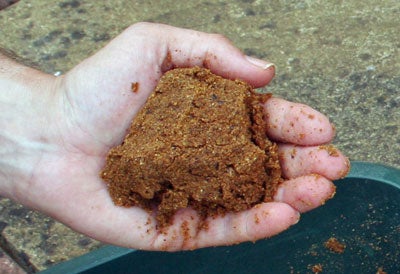
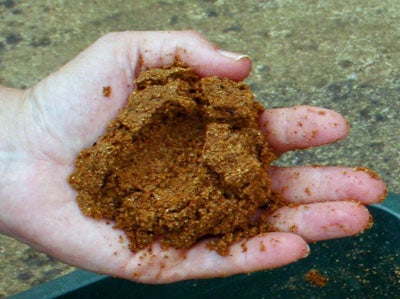
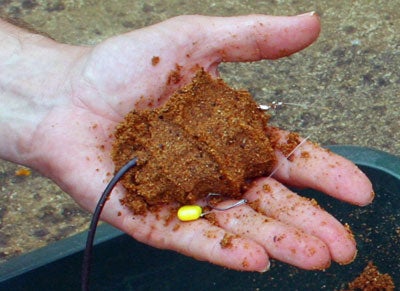
My chosen ingredients are placed into the mixing bowl and well mixed together, this serves two purposes. Firstly, it ensures any additives you have made are evenly distributed. Secondly, it gets the mix well aerated, this results in the groundbait ‘bursting’ from your frame once on the bottom, creating a smelly cloud which will assist in attracting the fish to your swim. Finally, water from the lake is added gradually until I’m satisfied with the consistency. A simple test for this is to make a ball of the mix in one hand and push a knuckle from the other hand into the ball, the mix is right if the ball is now dimpled but stays together without disintegrating. Continuing to push your knuckle through should result in the ball breaking up but only into a couple of still quite large pieces. (See figures 5 & 6).
Figure 5
Figure 6
Now to get the mix onto the feeder, bait onto the hook and the lot into the water.Bait the hook first and attach the hooklink to the frame!
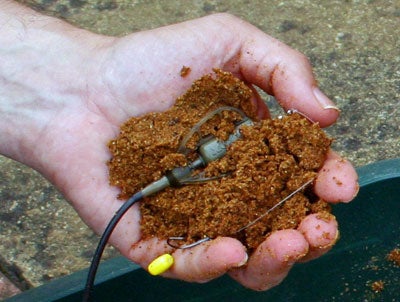
Take a good handful of the mix and lay the frame on top (figure 7), squeeze it all together with both hands until it is a roughly spherical shape. Using a knuckle, make a decent sized dimple between two of the frame flanges, place the baited hook in this dimple and surround it with a few pieces of your hookbait. (Figure 8).
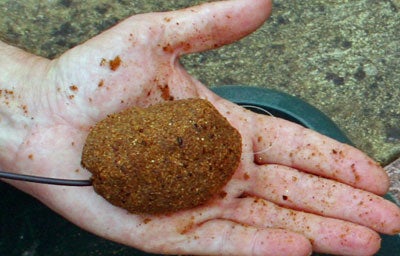
Take another handful of the mix and cover the hook and bait, reshape and even out the mix. With a little practice, the final shape can be molded to simulate an egg (Figure 9); this is good aerodynamically and will assist with casting distance and accuracy.
Figure 7
Figure 8
Figure 9
Casting
Remember, ultimately this mixture is intended to break up, it is just that you want this to happen in the water at your chosen spot not scattered across the lake between you and your swim. Casting action must be smooth and progressive. Range is limited by the effort you can apply without destroying your shaped mixture. If you are trying to reach France from Dover, this won’t make it.
I hope this article has gone some way to helping those interested in using ‘The Method’. Only a little practice is needed to get the mixture right and experimentation with ground/hook baits will soon see you hauling in the best your waters have to offer.
One last word of warning, this set up is designed to fall apart if there is a mainline break to safeguard the welfare of the fish. Any modification you may wish and are welcome to make, must do the same. The combination of feeder and bait here also results in quite some weight, nothing less than a good carp rod with a minimum 2.5lb test curve will survive for long.