HOW TO MAKE YOUR OWN MARKER/PIKE FLOATS
It is very easy to make your own Pike/Marker Floats; it’s also much cheaper than buying them and much more fun to make them yourself. I have been making my own floats for over 20 years now and I began when I was 13 or 14 years old. I have designed my own floats and tested them. Some work great, some not so well and a few have been useless. I am always looking out for new materials to use and I have stumbled across some great materials for making floats.
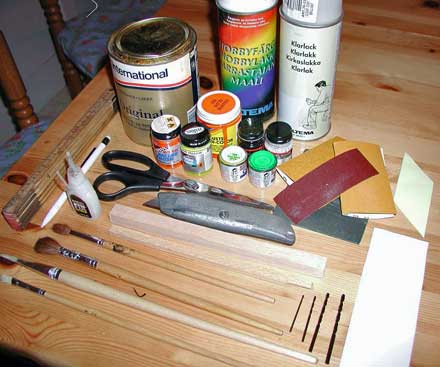
But by far the best material I have used for floats; especially Pike/Marker Floats is Balsa Wood. It will stand quite a good beating and it is easy to shape when making the floats. I have made floats from polystyrene, cork , quills (bird’s feathers), reeds, plastic tubes, drinking straws, aluminium and of course balsa wood. Equipment 1. Balsa Wood Materials to make the vein 1. Balsa wood 6mm x 6mm How to make the float
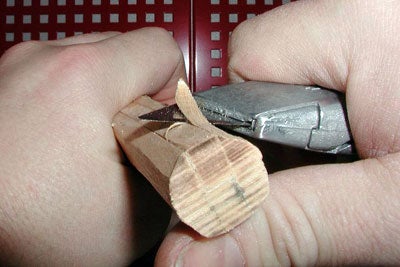
Then take the sharp knife and whittle it until it becomes round. This is easier than it sounds because the balsa is really soft. Don’t worry about getting it perfectly round with the knife. Step 2
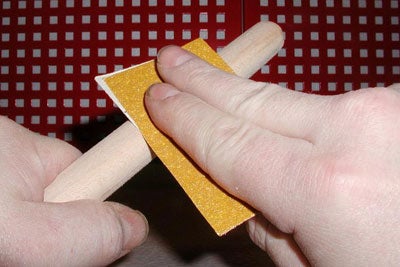
This is also quite easy due to the softness of the wood. Once it’s the shape you want, smooth it off with the fine sandpaper. Step 3
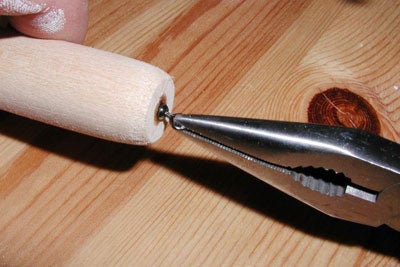
Then pull the swivel out of the float again and fill the hole with super glue and push the swivel back in again. Try not to get glue in the swivel or it will prevent the eye from rotating. Leave the glue to dry for a few minutes. Step 4
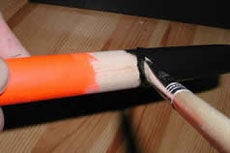
Take the white paint and paint the top end as this is going to be the visible end that sticks up out of the water. Once you have painted it let it dry. Then lightly rub it down with the smooth sandpaper removing any rough parts.
Don’t rub too hard, as you will remove the paint as well. Once this is done give it a quick wipe and another coat of white paint. Then let it dry again. Once it’s completely dry, give it another rub with the smooth sandpaper and then wipe the dust off with a cloth. Step 5
Note: You must put an undercoat of white paint on before the fluorescent paint or the fluorescent paint will not be fluorescent. Once again, when it is dry sand it down and give it another coat of paint. Let it dry completely before the next step. Step 6 You do not have to paint this end if you don’t want to; it’s obviously your choice.
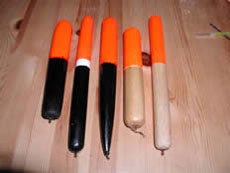
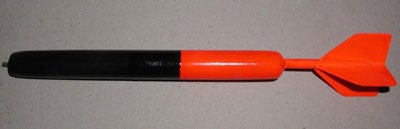
If you do paint it, it doesn’t necessarily have to be black. I usually paint mine black, dark brown or dark green. But I have made some and left the wood showing through and just varnished it (see pic at top). Once you have given it a couple of coats let it dry completely before the next step. Step 7 You can always give it two coats of varnish if you wish. You can use boat varnish, which is very tough and really protects the paint, or an aerosol varnish from a hobby shop will do. But if you use this, spray the float outside as the fumes from this kind of varnish are really strong. How to make the vane Not only does this increase the visibility of the float but also assists when casting, as the float will fly straight like an arrow. This makes the cast more accurate and increases the casting distance.
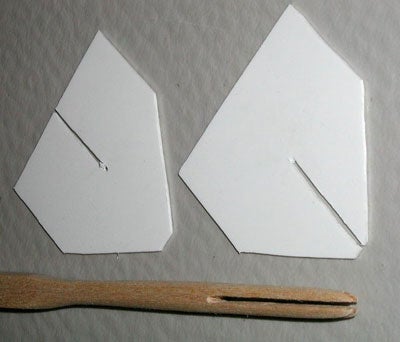
You can use the stems and flights from a normal set of darts and paint them yourself or you can make your own from a piece of balsa wood for the stem and cut the flight arrows out of a 5 litre plastic juice bottle. Firstly, measure and draw your vane on the plastic and cut it out using a sharp knife. When you have cut out one of the vanes, use this one as a template and draw a line round it. Then cut your second one out of the plastic. You should have two halves of the vane now that are both the same size.
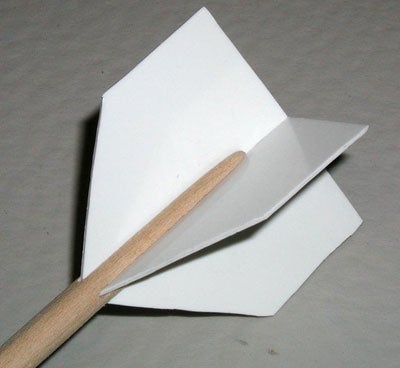
Now you need to cut out the two slots in the vanes so they can be fitted together in a cross shape. To cut the slots, measure half way from the bottom of the vane to the middle on one of them, and do the same on the other but measure from the top to the middle. Then carefully cut the slots out of the vane. To make the stem of the vane, take the 6mm x 6mm piece of balsa wood and cut a cross down the centre. This should be slightly smaller than the length of the vane. When you have done this you can shape the stem so it becomes round. This is best done with just sandpaper and not a knife. You can now cut the stem to the length you require remembering to leave an extra 20mm so you can insert this into the float.
To insert the stem into the float reduce the thickness of the stem by about 1mm with a sharp knife and sandpaper. Then drill a hole in the top of the float the same size as the stem. Then insert the stem and glue it in. Once you have got it right you can glue the vane into the stem as well.
Lightly sand the plastic vane so it leaves a rough surface for the paint to stick to. Then when the glue is dry you can paint it as you have the top of the float. Chris Thornhill, www.screamingdelkims.se. | ||||||||||||||
|
Welcome!Log into your account