


Pike fishing is somewhat unique amongst most types of angling in that we use two (usually) treble hooks and wire as a hook length material. But then pike are pretty unique in that they have teeth that will go through pretty much any material other than wire.
There has been much debate over the years as to the merits of the two hook rig and wire as a hook length material. Why this is open to debate I really don’t know as the reason why the pike trace, or snap tackle, has changed very little from the original design by Alfred Jardine is because it works every time.
The same cannot be said of other materials or of single hooks. There is a well known saying: ‘If it ain’t broke, don’t fix it’. The two hook trace isn’t broken as a design and so trying to reinvent the wheel so to speak is completely unnecessary.
Having said all of that there is much that can go wrong with traces and trace making and mistakes or malfunctions with a pike trace are serious for the quarry as there is every possibility of either sealing the pike’s stomach or throat, or causing damage in other ways.

To that end I am going to show you the methods I use to make traces using two of the commonest types of wire; I know that these work and won’t let me down because I have made and used them for years, however that is not to say that shop bought traces are to be ignored and in recent years the standard of readymade traces has improved and I am certainly happy to use those made by Fox or Eddie Turner tackle straight from the pack but for most pike anglers the only way forward is to make your own – and it is definitely cheaper in the long run.
Stiff Wires
Many wires these days are quite stiff, usually because they are coated, and the wire I tend to use of this type is Fox Carboflex, which I have the utmost faith in. To make traces with this type of wire you will need the tools in Figure 1; the only exception is the pair of forceps which are used with softer multi-strand wires, which I shall take a look at later.
 The first part of making a trace is to attach the swivel. First of all onto the wire goes your crimp, followed by the swivel itself. To attach the swivel put the wire through the eye once, then double it back again so that the swivel is held in a loop (Figure 2).
 Take the tag end and slide the crimp over it, and then pull up to just short of the swivel eye and crimp with your pliers, paying attention not to crimp too hard. You want the crimp flattened, but not to the extent that it is digging into the wire as this will cause a weak spot (Figure 3).

Once the crimp is flattened cut the tag end off flush with the end of the crimp (Figure 4).
 Some people here shrink tube or rubber sleeves here to tidy the whole look up, but personally I don’t bother (Figure 5).
You now have the swivel attached, but you obviously need to attach some hooks to make the trace complete.
Pull off around 20-24 inches of trace wire from the spool to which the swivel will already have been crimped. The final trace will be around 18 inches long, but you need a bit of extra as the next hook, the top hook of the trace, will be whipped on with the wire.
 So slide on your hook to approximately the position on the trace that you want it to finish up (Figure 6).

Now with your thumb and forefinger trap the hook in position and take the wire below it and pull up to form a loop (Figure 7).
 Trap this loop with your forefinger and thumb and then slowly whip around the shank of the hook (Figure 8).
 Whip the wire round the shank four or five times then pass the end through the wire and pull down slowly on the free end to take up the coils and hold the hook in position (Figure 9).
This hook is now fixed securely to the wire and won’t kink or damage the wire in any way.
Attaching the bottom hook is simply a repeat of the process by which we attached the swivel.
Firstly put on your crimp, then the hook, and pull up to a gap that will suit the baits that you intend to use (Figure 10).

 Take your crimping pliers and carefully crimp down (Figure 11).
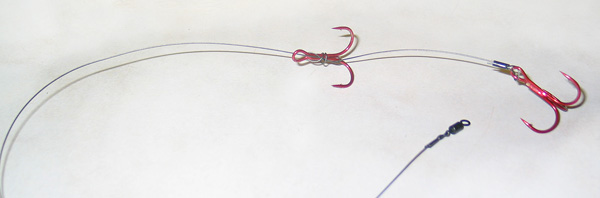
Cut off the tag end and there you have it, one completed trace (Figure 12).
Multi-strand wires
The main difference with multi-strand wires is that they have no coating and so they are softer and the wire is more exposed. This causes a different set of problems in so much as crimping is less effective and cutting and working with multi-strand can be more awkward as it has a tendency to unravel (Figure 13)

Unless the wire is first gently heated with a lighter (Figure 14).
However for the most part making a trace from multi-strand is not that different.
 Attaching the swivel is very similar in that it is placed onto the wire and then doubled back through as we did with the coated wire (Figure 15).
The main difference in the two now comes as with this material the best method is to use the suppleness to twist the wire around itself. To do this take a pair of forceps and clamp them across the wire diagonally (Figure 16).

It’s important to clamp diagonally across the wire as this allows the forceps a greater surface area to grip to and as the next stage of the process will be to swing the forceps around the wire, you really do not want them flying off!

Once the forceps are in place take the wire spool in one hand and the swivel in the other and hold them at arm’s length so that the forceps hang vertically (Figure17).
 Now you spin the forceps over the trace wire like a helicopter blade until all of the tag end is twisted onto the main wire to the point that the forceps are gripped to (Figure 18). Cut off the tag end and then move to the hooks.
To attach the top treble follow exactly the same process as for the coated / crimped trace (Figure 19).

Then to attach the bottom treble repeat the process for attaching the swivel, only this time you have to grip the bottom treble and swivel and swing. Again cut off the excess and you have a finished trace (Figure 20).

In reality it will take a bit of practice to make perfect traces but it is not beyond anyone’s ability to make top notch traces in just a few minutes. Once they are finished the best thing to store them on is a tubular rig bin, and they are ready to go the next time you need to change a trace.
