The driftfloat is a very useful tactic for the pike angler who wishes to present a bait at extreme range. Now with modern floating, low stretch braided mainlines this tactic is even easier to use. Drifters from the tackle shop are not that expensive but the beauty of making your own is that you can customise it, ie, in terms of style, size of bait it will support, and size of vane.
As always keep the cost down by utilising any materials you already have. The first thing you will need is the body of the float. I like to use either polystyrene balls or polystyrene eggs.Although available from the tackle shop these are usually much cheaper from arts and crafts shops, where they’re sold for making heads on dolls.
Another alternative are the plastic Kinder eggs, but these must be glued together to make them watertight. The next component is for the stem of the float. You can use a lot of things here depending what is available. Some suggestions are wire or glassfibre dowel, both available from the model shop. I personally tend to splash out here and buy a pack of either the ET or Fox stems!
We now need to look at the material for the vane. Any plastic of a suitable thickness can be used here. If you are on a budget then you can cut a section from a plastic bottle. I go to the model shop again and buy a sheet of plastic card. It doesn’t cost much and one sheet supplies a lot of spare vanes.
To paint the body you will need a tin of black/green ‘Airfix’-type enamel paint. For the vane buy a tin of fluorescent orange, yellow or red car spray paint. A tin of matt or silk black won’t go amiss either as black vanes can show up best in bright conditions. I will assume that you already have some swivels, snap links and rig tube.
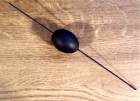
The first step is to take the body and make a hole through the centre. Do this as accurately as possible and no bigger diameter than the diameter of your chosen stem. For this I have always found a drill best. Paint the body your chosen colour with the enamel paint. Take the stem and slide on a 5mm length of rig tube. If the stem does not come with an eye attached then you must fit one. Fox supply ready-made plastic eyes or as usual you can make one yourself out of the eye from a safety pin. Slide the body onto the stem.
The next thing to make are the vanes. Mark out a square on the plastic material to the size you wish. For a standard sized pike float (using an egg or 1 1/2 Polyball) then I would suggest a size of 4in x 3 1/2 in. Round-off the corner, as this stops the line catching, and punch a hole in the centre, 10mm from the top. If you are using a sheet of plastic card it pays to make several at a time as vanes do become damaged and a choice of colours for different light conditions is very useful. When you spray the vanes you may find that the thinners in the paint has made the plastic go very soft. Don’t worry as soon as it dries it will harden up again!
Once you have made the vanes you can use one to measure the correct distance to move the body down the stem. Once in the right place slide up the piece of tubing under the body. This will keep it in place. The method used to hold the vane on is the tried and tested rubber band but with one of my own improvements. Attach the band above the body by looping it as shown. On the other end of the band loop on a short piece of cocktail stick or similar. To attach the vane lay it along the stem, push the stick through the hole and pull the band over the top of the stem. The vane can still detach when you get a fish or you have to wind in, but the piece of stick will stop you losing it! If you like to fish your float ‘top & bottom’ another piece of rubber can be slid on to the top of the stem and a small quivertip intermediate ring pushed in.
A lot of people, myself included, prefer to use the float ‘bottom only’. To help keep the line afloat and reduce tangles a controller is used. These are simple to make. You will require some stiff rig tube, rubber tube, a cork or small (1/2 in) polyball, a swivel and a keeper ring (or some wire to form similar). Paint the cork or ball in a bright fluoro colour and drill out to accept the tube (which should be just a bit longer than your float). Glue it in place at the end of the tube. At the other end attach the keeper ring or the loop of wire you have fashioned. Before doing this make sure that you have threaded a swivel on to it as shown. Attach the float via a snap link.
In my ‘Piking With The Driftfloat’ article (see link below) I have explained how I rig this float up and how I use it. So get some made up!
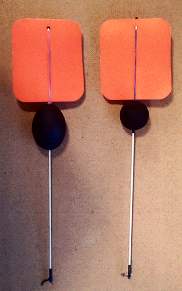
The finished driftfloat and controller
Send your tackle making requests and repair advice to Tackle Workshop. And if you have a good tip for making tackle we’ll be very pleased to hear about that too.


 Now with modern floating, low stretch braided mainlines this tactic is even easier to use. Drifters from the tackle shop are not that expensive but the beauty of making your own is that you can customise it, ie, in terms of style, size of bait it will support, and size of vane.

 The next thing to make are the vanes. Mark out a square on the plastic material to the size you wish. For a standard sized pike float (using an egg or 1 1/2 Polyball) then I would suggest a size of 4in x 3 1/2 in. Round-off the corner, as this stops the line catching, and punch a hole in the centre, 10mm from the top. If you are using a sheet of plastic card it pays to make several at a time as vanes do become damaged and a choice of colours for different light conditions is very useful. When you spray the vanes you may find that the thinners in the paint has made the plastic go very soft. Don’t worry as soon as it dries it will harden up again!


