


| WELCOME TO FIRST CLASS FISHING | |
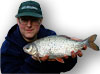
‘First Class Fishing’, a series of classes for beginners and improvers conducted by Dave Cooper, an all-round experienced angler with a string of good fish and good catches to his credit. The classes are aimed at those who have recently discovered the joys of fishing and need guidance on using tackle correctly and wish to improve their basic skills. Dave will cover a specific topic at a time in this bi-weekly column. The first section will be really basic with subsequent ones building on the skills covered previously. His aim is to explain things as simply and concisely as possible and will assume that the reader knows absolutely nothing about the subject.
|
FLOAT FISHING
Part One – What You Need
If I was going to teach someone to fish I would start them on float fishing and take them to a stillwater. So that’s where this series will start, by showing you the basic grass roots of stillwater float fishing.
 One type of waggler float |
Before you can go float fishing you need to assemble the correct tackle. This is what you need:
- Float rod, minimum 12ft in length
- Small fixed spool reel
- 3lb breaking strain line
- Small selection of waggler floats
- Box of lead free split shot
- Hooks ready tied to nylon
- A plummet
- Small bait catapult
- Rod rest
- Bait containers
- Bait
- Landing net
- Disgorger
All of the above are available from local tackle dealers. Make good use of your tackle dealer and tell him exactly what it is you want and what your budget is. Don’t be afraid to ask him questions, if he’s worth your money he should be willing to make sure you get kitted out correctly.
Let’s look at these items in more detail, what they are for, why a particular type and why you need them.
The rod – There are literally hundreds of rods of many different types, made by many different manufacturers and all very confusing to the newcomer I’m sure. So what do you buy? Well, for float fishing you need a rod that is purposely designed for casting a float, pure and simple.
They are usually called ‘float’ or ‘match’ rods. I say in the list above that you should buy one that is a minimum of 12ft long, though 13ft is probably the ideal length. There is a very good reason for this as it is the length of the rod that enables easy casting of a light float rig. The shorter the rod the harder it is to cast a float.
Even children should be encouraged to use as long a rod as it is possible for them to cope with. A child as young as seven or eight will quickly learn to handle a rod of 12ft long as they are very light for their size these days (the rods that is, not the children!). Avoid at all costs the cheap ‘starter kits’ with rods of four or five feet long, and telescopic type rods, they are usually a complete waste of time and money.
A standard float or match rod should be made up of three sections and have at least 12 rod-rings evenly spaced along its length to aid the flow of line on the cast. Fewer rings with large gaps in between will allow the line to ‘slap’ against the rod itself, increasing friction that will slow down the flow of line and hence reduce the distance that a float can be cast. The rod should have a ‘tip action’ which means it should bend easily in the tip section and progressively less easily in the middle and lower sections. To test this put the rod together and ask someone to pull down on the rod tip. Look at the shape of the rod as it bends. The reason a float rod has a soft top is to help stop small fish being ‘bumped’ off the hook.
Generally, the more money you are able to spend on a rod of any type the better the product will be. The more expensive the rod, the better will be the quality of the carbon fibre it is made from, the slimmer and lighter the rod blank will be and the line guides will be lined with harder and smoother materials. Always buy the best your budget will allow. Having said that, some of the cheaper rods from the top name manufacturers are still very good indeed.
The reel – The reel should be a small fixed spool reel capable of holding at least 100 metres of 3lb breaking strain (bs) line. It should have an interchangeable handle so that it can be used by left or right handed people. A right handed person will normally hold a rod in their right hand and wind the reel handle with their left hand. It should have a bale-arm that opens easily and returns solidly back into the closed position on turning the reel handle. The bale-arm should also have a line guide. Ideally buy one with a line roller that actually turns as this will prevent excessive line wear and line twist. The reel should have an anti-reverse switch that when set will prevent the reel being wound backwards and it should have a variable ‘clutch’ or ‘drag’ switch that allows the spool to rotate under excess tension from a fighting fish, enabling line to be pulled from the reel before it reaches its breaking point.
The line – I recommend starting off using 3lb breaking strain line. This is light and thin enough to cast well and give good presentation, yet strong enough under normal circumstances to cope with all but the biggest of coarse fish.
Floats – I will cover the floats in more detail in part 2 of ‘Float Fishing’, but suffice to say here that you don’t need to get too complicated too soon. A small selection of waggler (attached bottom end only) floats in the 2AAA to 3AAA size is all you need to start with. Like most anglers, in a few years you will probably collect a fair number of wagglers in all shapes, sizes and colours imaginable, but to start with one or two that I will go into more detail on later is all you need. The 2AAA and 3AAA size refers to the number and size of split shot required to ‘cock’ the float correctly in the water.
Split shot – Split shot are the weights used to ‘cock’ a float i.e. make it sit upright in the water with just the tip showing. They are often just referred to as ‘shot’ or sometimes as ‘lead shot’, though this is misleading as split shot have not been made out of lead in the UK for many years due to its toxicity. Split shot is now made from a tungsten alloy that is not harmful to wildlife if accidentally swallowed.
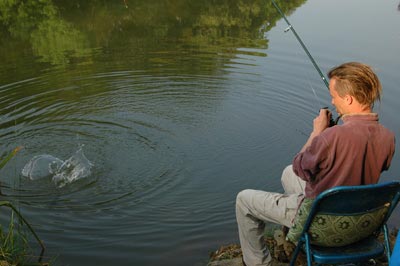
 Using a bait catapult |
Hooks to nylon – Hooks can be purchased ready-tied to a short hooklength and are usually referred to as ‘hooks to nylon’. This hooklength is joined to the reel line using two loops. I will explain how in more detail in part 2. The hook sizes you need to start with are sizes 16 and 18 in a general fine wire, preferably barbless, pattern. These hooklengths also come in specified breaking strains. The hooklength you use should always be a slightly lighter breaking strain than the reel line. This is because if your rig becomes caught on something, maybe on a bush or a snag in the water, and has to be pulled out, the line might well break and you want the line to break as close to the hook as possible to keep the loss of line and tackle to a minimum. Therefore buy hooklengths with a breaking strain of approximately 2lb to 2.5lb.
Plummet – It is imperative that you know the depth of water that you are fishing so you can set your bait to be fishing just on the bottom. The way to find out the depth your swim is by using a plummet. Essentially a plummet is a lead weight that you attach to your hook. By casting out with the plummet attached will tell you whether your float is set too shallow or too deep depending on whether it is pulled under by the weight of the plummet or lays flat on the water. By adjusting the depth of your float until just the tip of your float is showing above the water is how you find the exact depth.
Bait catapult – Perhaps not entirely essential as you can throw free bait offerings in by hand, but correct and accurate feeding of a swim is imperative to successful fishing and baiting by catapult is, with practise, far more efficient and accurate than that which can be achieved by hand. A small match-type catapult with a soft pouch designed to fire maggots and small particles is what you need.
Rod rest – A rod rest is essential for holding the rod safely while baiting hooks and unhooking fish. It is also a great help in ensuring that your rod stays still and doesn’t pull your float about and not least because holding a 12 or 13ft rod for several hours at a time is very tiring on the arm even with today’s lightweight versions.
Bait containers – It is best to buy purpose-made bait boxes, although you can make do with any reasonable sized plastic box with a secure lid. The purpose-made ones are designed primarily to keep live baits such as maggots and worms in as they have perforated lids to allow air through.
Bait – The number one bait for the beginner is the maggot and for now I wouldn’t look at too much else, except for perhaps sweetcorn and bread if maggots are not available for any reason. Maggots are simple to use and are eaten by almost every fish that swims.
Landing net – A landing net is an essential piece of kit and you shouldn’t go fishing without one. You may be able to land fish of a few ounces by swinging them in, but anything from half a pound up will require a landing net if you don’t want to be in danger of snapping your line or pulling the hook from the fishes mouth. Neither is desirable, not least for the fish. The net itself should have a diameter of around 18 inches minimum with a handle of at least 6ft long.
Disgorger – A device for removing the hook from a fish’s mouth. Always carry a disgorger, preferably at least two in case you lose one. Small hooks often go a long way into a fishes mouth and it is not always possible to retrieve them with your fingers. A disgorger makes removing deep-set hooks a doddle without risk of harming the fish.
In part 2 of ‘Float Fishing’ I will be showing you how to put the above tackle and bait to use on a stillwater. See you then.

